Jewelry Armoire
Primary tabs
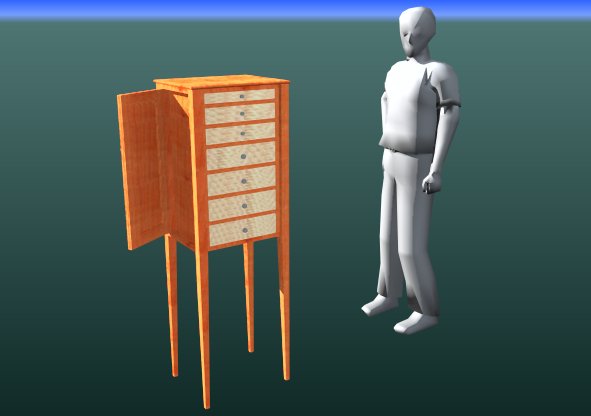
A 10-drawer floor standing jewelry cabinet in Sycamore, Maple and Cherry, with doors on the side to cover necklace storage areas, and front doors to cover the drawers.

My wife Adriana has a lot of costume jewelry as well as some nice fine jewelry. She asked me last year to make her a jewelry box that's big enough for everything. I, of course, went overboard. I've designed it and redesigned it about four times now. But I'm sort of committed to the latest design. This will be, by far, the most complicated piece I've ever made. I hope to finish it some time this year.
It will be about 58" tall, about 17" wide, and about 15" deep. The materials will be mostly quarter-sawn sycamore with cherry accents. The front doors will have japanese paper decorative inserts, sort of like this Tom Fidgen piece from his book Made By Hand. (I like the book, but this isn't a direct project from it. I just took this door design detail from the bookshelf project.)
The design has evolved quite a bit since the beginning, as you can see from the attached Sketchup renders. I like the wood contrast, the drawers, and the front doors of the piece as it is now, however I'm not sure I like it's height. But I will stick with it now because Adriana likes the design and its the right height for her, with enough room for all of her jewelry pieces.
Update: September 27, 2011 – Largely because of the need to cobble together large panels of the creamy white sycamore out of the two-tone lumber, this project will have many more panel glue-ups than I've done on any project before. 18 panels need to be created. I've got 7 done so far. I realized after putting together my attached photo gallery that I don't currently have any build photos of this. The only one is some parts that are visible in the background of the benchtop assembly photos. But I am making good progress on the armoire.
Update: January 20, 2012 - After a long period of stagnation, this project is moving again. Probably had something to do with Mom. Anyway, I got parts sized and thicknessed over the Christmas holiday, but didn't get going on the case joinery until this past weekend (Jan 14th.) Squared the legs to close to the final size, planing off the saw marks. Used the Stanley No 8 to flatten the size panels. Cut the top tenons to set the orientation of each side, then transferred the layout marks to one side wall. (I'm working on my old 'kid colored' workbench (built in as part of the house when we bought it. My new workbench is coming along, but not ready for use yet.)
Update January 20, 2012 -- I was about to order hardware for this project, and I had a whole set of knobs and necklace holders picked out. Then I realized that the drawing I had showed custom made wooden parts for those components. And I now have a lathe and a bit of experience using it, so I'm going to go ahead and make the drawer pulls and necklace hangers. I still need to pick out and order hinges. I'm shocked at the cost difference between basic Home Depot (Chinese) hinges and brass hinges from a quality source. Home Depot? $3 to $5 per hinge, screws included. Horton brass hinges through Lee Valley: $38 to $45 a pair, no screws included, So $3 versus $19 a hinge. But, looking at the Home Depot stuff, I have to say, boy, can you see the truth in the phrase, "You get what you pay for." I'll bite the bullet and buy the four sets of brass hinges I need. I'm still hoping to make my own (a lá Krenov) door stops and latches (front) and magnet catches on the sides. (I already bought the magnets, I'm not going to go out and try to dig up rare earth.)
I've been contemplating trying to dress up the legs somehow. But Adriana told me to stop with the designing and just build the damned thing. I am going to add the cherry 'socks' to the legs, otherwise I think it would be a bit too plain.
Update: December 31, 2012 -- This is an update on the 'jewelry armoire' project I'm doing for my wife. I finalized the design in September of 2011, and didn't really get started until January of last year. Now that my shop is up and working again, I'm making some good progress on it. As of last spring, I had managed to cut the top and sides, and fit them together, but the next critical piece is the case bottom. This single panel is probably the most complicated joined piece I've ever attempted to create with hand tools. (I did cut the panel to final dimensions using the table saw, but after that it was all hand tools.)
In the attached photo album, I kind of walk through what I did to cut the base joinery, fit it to the case sides, and then notch and fit the legs. I've included the original sketchup picture of the design for reference.
The base includes two through mortises for each side tenon, and then each side also needs to fit down into a 1/4" deep dado. Each side is notched at the bottom front edge so that the dado doesn't show up from the front of the case. Then there's a rabbet along the top back edge of the case bottom for the eventual case back. This was really my first true test of my Veritas small plough plane, and the first time I've created a dado using my Veritas router plane. Both worked very well.
The bottom has notches cut out of each corner to allow the legs to extend all of the way to the top of the cabinet, but tabs within each corner notch will fit into leg notches. These, plus screws through the leg tops into the case sides will provide the structural strength of the legs on the cabinet. After all of the hassle of finding enough quarter-sawn sycamore sapwood to make up the panels in this piece, I am finding working with the sycamore quite pleasant. Very similar to other Acer (i.e. maple) woods, but a bit softer.
Up next, I'll taper the legs, and work on the drawer web frame.
Update: June 10, 2013-- Design notes update As I did the final dry fit of the web frame, I'm at the point where I have to finalize the design so I can start the glue up. Three decisions: 1) I am going to do the simple 'sock' details at the foot of each leg, with a 2" piece of cherry veneer, topped by a thin (1/8") band of holly around each foot. 2) I was debating whether to put the quarter sawn sycamore as a veneer facing on each of the drawer divider case fronts, but I think that will just make the design too busy, so I'm not going to make that effort. 3) And finally, I think I am going to put a stopped chamfer on the outside corner of all four legs to break up the monolithic look of the piece when viewed from the front with the doors closed. I plan to stop the chamfer about 2" from the top and about 2 or 3" above the 'socks' at the bottom, both ends finished with a lamb's tongue detail.ion
Update: October 28, 2013-- Updated design PDF and drawings. As requested by a reaader, I'm posting an updated version of the Sketchup design document (Rev 17) and I'm also adding a set of drawing files that were generated out of the Sketchup, delivered as a zipped set of JPG images. The Sketchup file is 2.7MB. The zipped archive is about 3.4MB. NOTE: The Rev 1B cutlist file has not been verified against these newer Rev 17 Sketchup designs. The designs also do not yet include details about the door joinery.
Update: November 14, 2013-- While cutting the parts for the drawers, I've committed to doing dovetailed drawers rather than the original design of simple rabbets.
Update: May 29, 2014-- Created a design refinement on the side doors. Began work on getting final dimensions for door parts. See this update for details.
Update: August 20, 2015 - Longest project in history. I'm set up in the new shop now, so I tried to pull out this project and make some progress. Minor project update today.
Update: January 2, 2016 – Bought some poplar to use as the case back. Used my new rabbet plane to do some hand work. Cut them to size and shiplapped them to fit the rear of the case. Case back installed.
Update (Upon completion): September 5, 2020 - Both in an effort to just finally finish this project, and also because having extra doors would make this harder to use as a jewelry cabinet, I opted to not build and leave off the original front doors.

| Attachment | Size |
|---|---|
| 17.5 KB | |
| 3.38 MB | |
| 2.68 MB | |
| 2.91 MB | |
| 4.42 MB | |
| 1.19 MB |